maya打造郑和下西的洋特
看一下效果图。
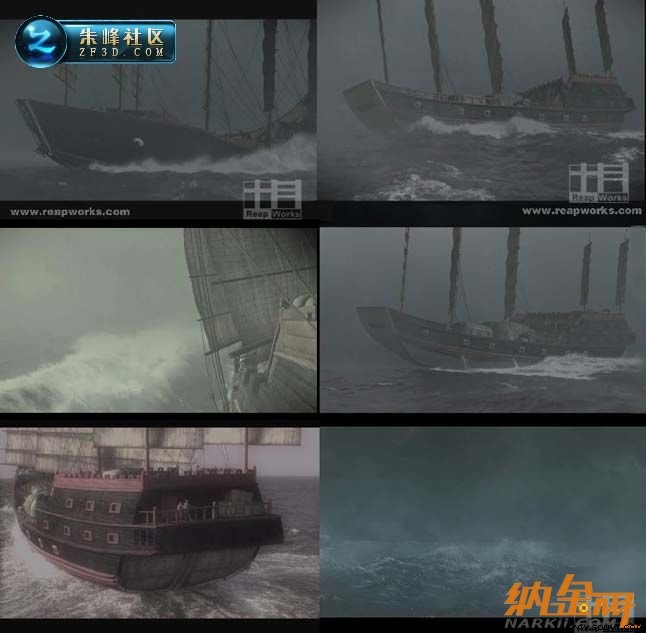
1、本片的特效部分主要集中在海洋的表现上,尤其是几场暴风雨镜头确实具有挑战性。实现真实可信的cg海洋并非易事,但是maya为我们提供了一套非常科学、方便的流体系统,尽管网上对三维软件的谁优谁劣争论不朽,但是我认为至少在海洋特效上maya拥有其它软件无法比拟的视觉的效果。好,现在我们一起走进maya强大的流体世界吧。
先切换到动力学海洋模块流体特效。
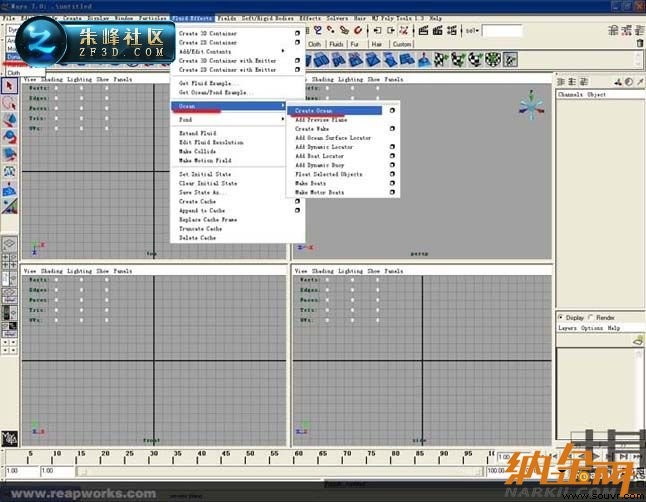
好了,我们已经创建了一个海洋并且同时系统自动为我们创建了一个oceanshader。
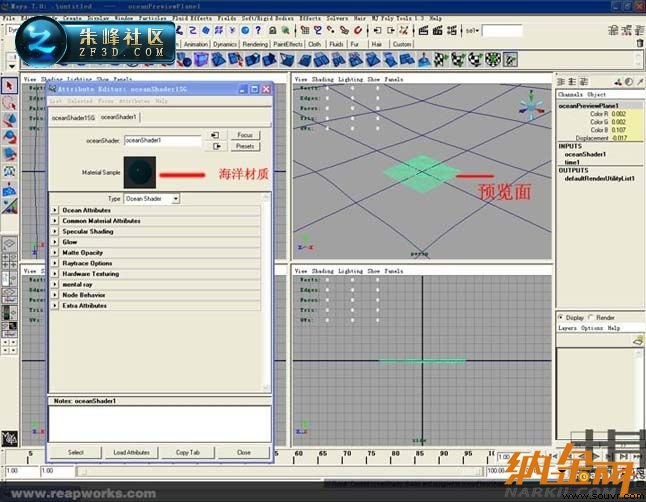
点击放大
我们可以把海面想成是一个非常大nurbs物体,而预览平面可以方便直观的对自己的调节做预览。而oceanshader不仅提供了一般材质的表面属性调节,还提供了对海洋动画的调节,确切的说它更象是一个动画材质。下面我具体介绍一下oceanshader的几个比较重要的参数。
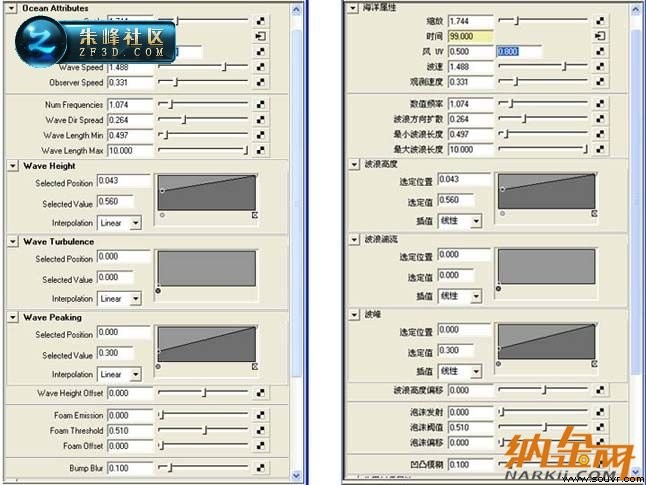
下面看看它们的具体应用。

波速没有什么好说的速度越快湍流越急。
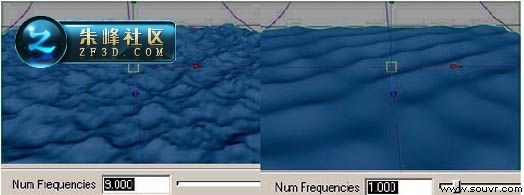
如图。

wave height。
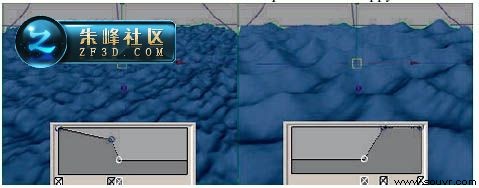
wave tubulence。

wave peaking。
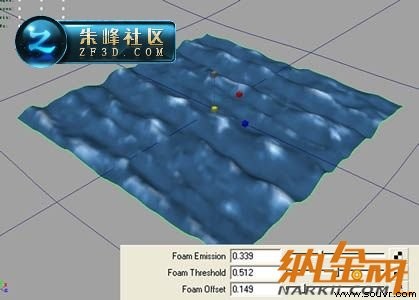
好,有了上面的基础我们来制作一段暴风雨镜头。首先生成一个海面,摆一个比较舒服的机位。
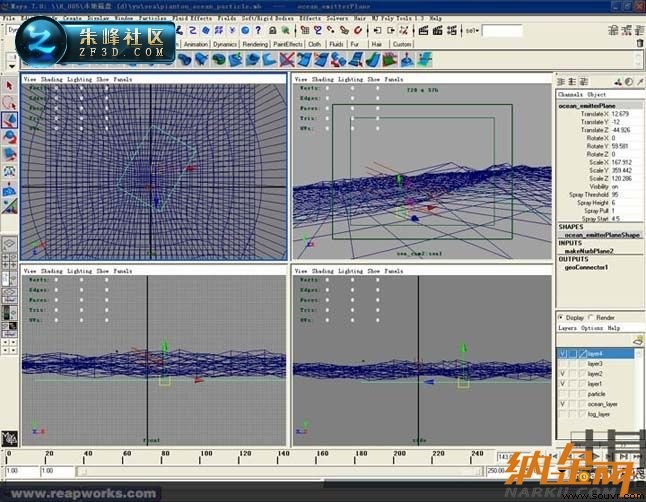
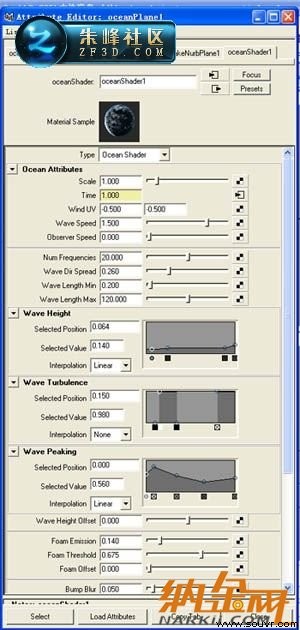
细心调解oceanshader,在这里我给出我的调节参数仅供大家做参考。
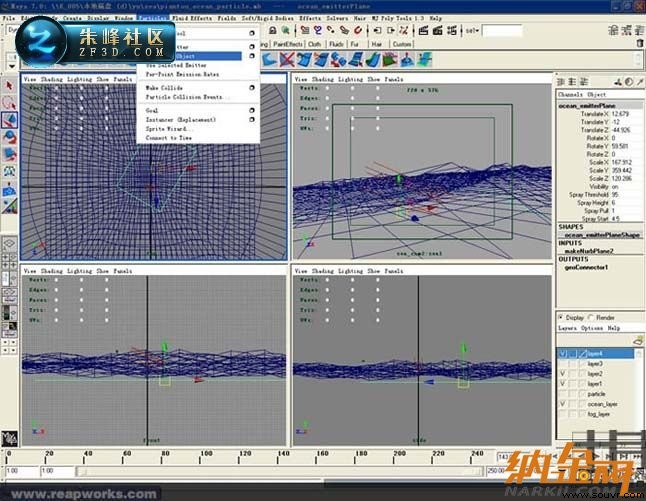
然后就是制作波涛汹涌的波浪,这里我们用到了粒子系统,众所周知maya的粒子系统是十分强大的,下面看看我们是如何实现的。首先我们先做一个nubrsplane这个物体将作为粒子的发射面。

点击放大
选择从物体发射粒子。
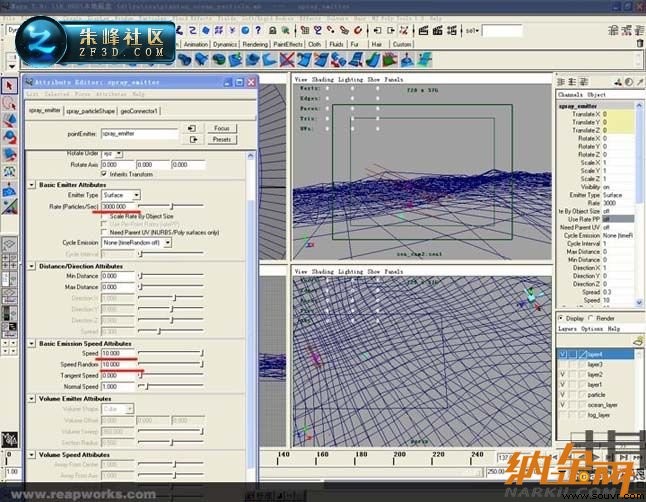
对单位时间粒子的发射数量,和粒子的发射速度进行调节。
点击放大
对单位时间粒子的发射数量,和粒子的发射速度进行调节。

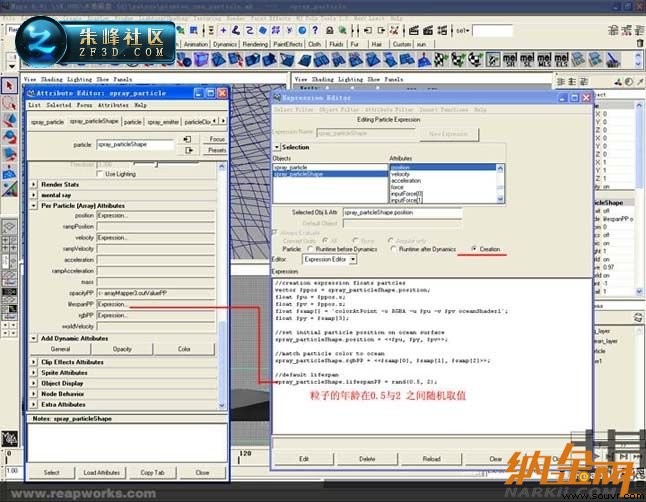
粒子出现了,但是位置好象不对,浪花应该出现在浪尖上才对,那么这里我们需要用表达式对粒子的位置进行控制。
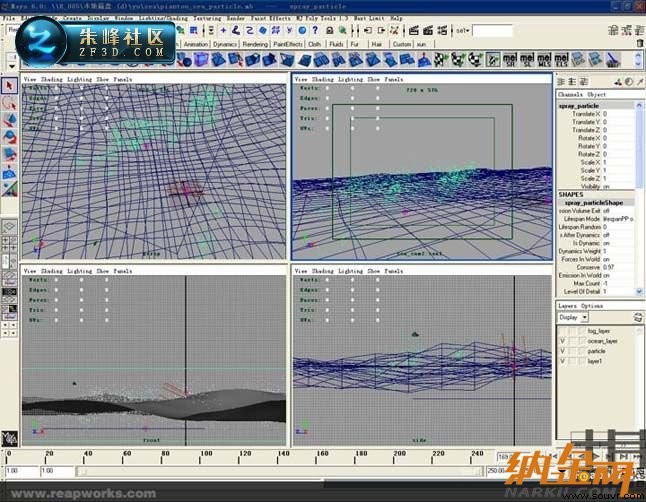
点击放大
//creation expression floats partcles
vector $ppos = spray_particleshape.position;
float $pu = $ppos.x;
float $pv = $ppos.z;
float $samp[] = `coloratpoint -o rgba -u $pu -v $pv oceanshader1`;
float $py = $samp[3];
//set initial particle position on ocean Surface
spray_particleshape.position = <<$pu, $py, $pv>>;
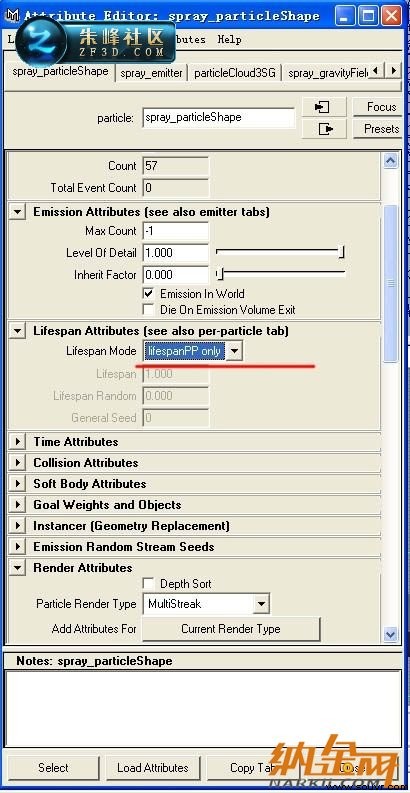
我们还要对粒子的寿命进行控制

spray_particleshape.lifespanpp = rand(0.5, 2); 对粒子的速度进行控制。
点击放大
//runtime expression for ocean spray
//check wave Surface height
vector $ppos = spray_particleshape.position;
float $pu = $ppos.x;
float $pv = $ppos.z;
float $samp[] = `coloratpoint -o a -u $pu -v $pv oceanshader1`;
float $py = $samp[0];
//clamp lower particle altitude to wave height
if($ppos.y <= $py) {
spray_particleshape.position = <<$pu, $py, $pv>>;
}
//drive particle down when it's too high
else if($ppos.y > $py + ocean_emitterplane.sprayheight) {
vector $pvel = spray_particleshape.velocity;
spray_particleshape.velocity = <<$pvel.x, $pvel.y - ocean_emitterplane.spraypull, $pvel.z>>;
};
注意这里
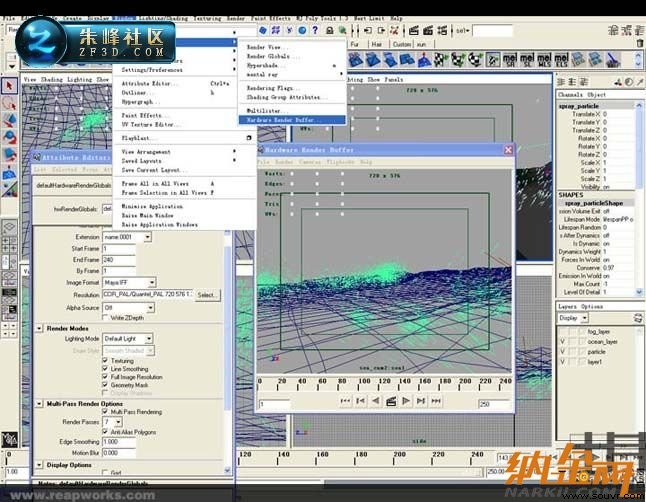
渲染粒子是在maya的硬件渲染器下进行的,最后在后期软件里把粒子和海洋进行合成。
点击放大
效果如图。

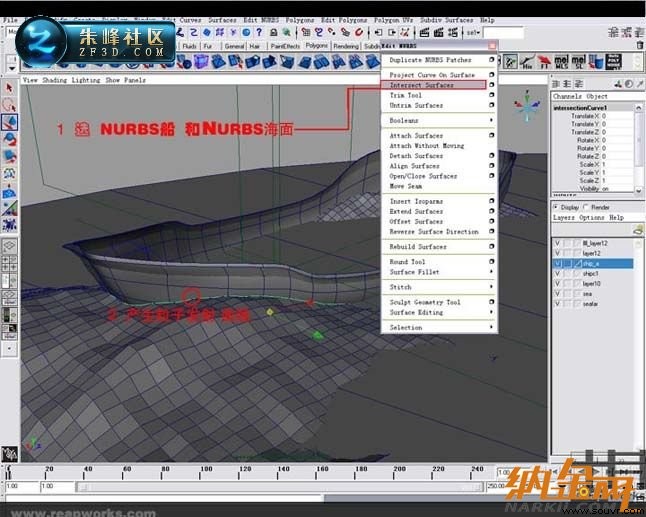
本片特效中有不少船队乘风破浪的镜头,我现在将对其中的要点给大家做一下讲解:首先提取海面与船的相交线。
点击放大
用这条线作为粒子的发射器。
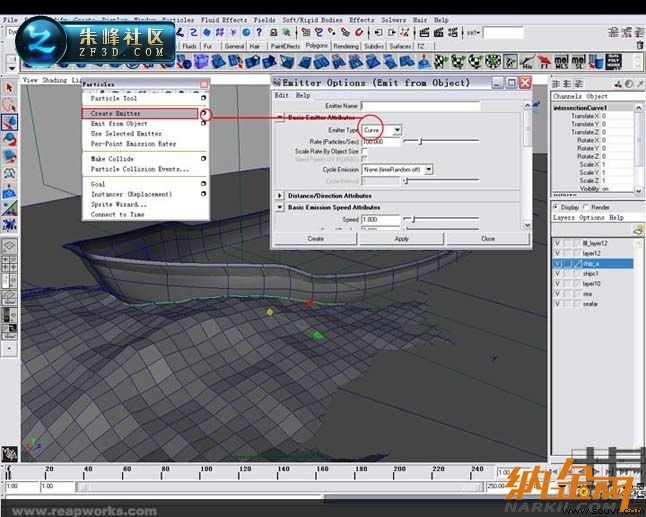
本片特效中有不少船队乘风破浪的镜头,我现在将对其中的要点给大家做一下讲解:首先提取海面与船的相交线。

点击放大
用这条线作为粒子的发射器。

这样就可以了。
本篇3d教程完。

1、本片的特效部分主要集中在海洋的表现上,尤其是几场暴风雨镜头确实具有挑战性。实现真实可信的cg海洋并非易事,但是maya为我们提供了一套非常科学、方便的流体系统,尽管网上对三维软件的谁优谁劣争论不朽,但是我认为至少在海洋特效上maya拥有其它软件无法比拟的视觉的效果。好,现在我们一起走进maya强大的流体世界吧。
先切换到动力学海洋模块流体特效。

好了,我们已经创建了一个海洋并且同时系统自动为我们创建了一个oceanshader。

点击放大
我们可以把海面想成是一个非常大nurbs物体,而预览平面可以方便直观的对自己的调节做预览。而oceanshader不仅提供了一般材质的表面属性调节,还提供了对海洋动画的调节,确切的说它更象是一个动画材质。下面我具体介绍一下oceanshader的几个比较重要的参数。

下面看看它们的具体应用。

波速没有什么好说的速度越快湍流越急。

如图。

wave height。

wave tubulence。

wave peaking。

好,有了上面的基础我们来制作一段暴风雨镜头。首先生成一个海面,摆一个比较舒服的机位。

细心调解oceanshader,在这里我给出我的调节参数仅供大家做参考。

然后就是制作波涛汹涌的波浪,这里我们用到了粒子系统,众所周知maya的粒子系统是十分强大的,下面看看我们是如何实现的。首先我们先做一个nubrsplane这个物体将作为粒子的发射面。

点击放大
选择从物体发射粒子。

对单位时间粒子的发射数量,和粒子的发射速度进行调节。

点击放大
对单位时间粒子的发射数量,和粒子的发射速度进行调节。

粒子出现了,但是位置好象不对,浪花应该出现在浪尖上才对,那么这里我们需要用表达式对粒子的位置进行控制。

点击放大
//creation expression floats partcles
vector $ppos = spray_particleshape.position;
float $pu = $ppos.x;
float $pv = $ppos.z;
float $samp[] = `coloratpoint -o rgba -u $pu -v $pv oceanshader1`;
float $py = $samp[3];
//set initial particle position on ocean Surface
spray_particleshape.position = <<$pu, $py, $pv>>;
我们还要对粒子的寿命进行控制

spray_particleshape.lifespanpp = rand(0.5, 2); 对粒子的速度进行控制。

点击放大
//runtime expression for ocean spray
//check wave Surface height
vector $ppos = spray_particleshape.position;
float $pu = $ppos.x;
float $pv = $ppos.z;
float $samp[] = `coloratpoint -o a -u $pu -v $pv oceanshader1`;
float $py = $samp[0];
//clamp lower particle altitude to wave height
if($ppos.y <= $py) {
spray_particleshape.position = <<$pu, $py, $pv>>;
}
//drive particle down when it's too high
else if($ppos.y > $py + ocean_emitterplane.sprayheight) {
vector $pvel = spray_particleshape.velocity;
spray_particleshape.velocity = <<$pvel.x, $pvel.y - ocean_emitterplane.spraypull, $pvel.z>>;
};
注意这里

渲染粒子是在maya的硬件渲染器下进行的,最后在后期软件里把粒子和海洋进行合成。

点击放大
效果如图。

本片特效中有不少船队乘风破浪的镜头,我现在将对其中的要点给大家做一下讲解:首先提取海面与船的相交线。

点击放大
用这条线作为粒子的发射器。

本片特效中有不少船队乘风破浪的镜头,我现在将对其中的要点给大家做一下讲解:首先提取海面与船的相交线。

点击放大
用这条线作为粒子的发射器。

这样就可以了。
本篇3d教程完。
上一篇:Maya制作玻璃材质过程赏析[ 01-17 ]
下一篇:3D打造个性美女制作过程赏析[ 01-17 ]


