


maya制作冰块材质

本节maya教程教大家用MAYA制作冰块材质,教程难度中等,适合比较初级的MAYA材质学习者。先来看看最终的效果图:
 制作软件:MAYA
步骤:
1、首先,创建一个Phone材质,赋予场景中的物体。将Color调成白色,Cosine Power的值设为10,Reflectivity的值设为0.5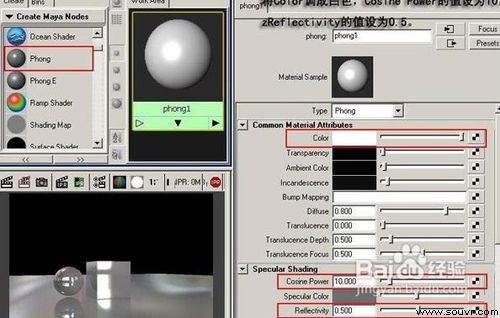 2、打开Hypershade窗口中的Color Utilities栏,创建一个Blend Colors节点,将color1设为白色,color2设为黑色,将它连接到phong1材质的Transparency属性上,物体呈半透明状态
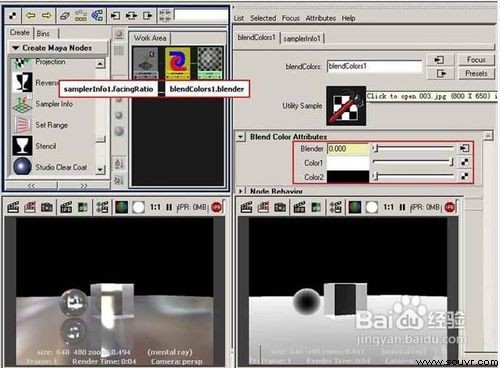
 3、打开Hypershade窗口中的General Utilities栏,创建一个samplerInfo节点,中键将它拖到Blend Colors节点上,在Connection Editor中,将samplerInfo节点的facingRatio属性连接到Blend Colors的Blender属性,这样物体和摄像机比较接近,垂直的面就接近透明,和摄像机方向接近平行的面,接近不透明
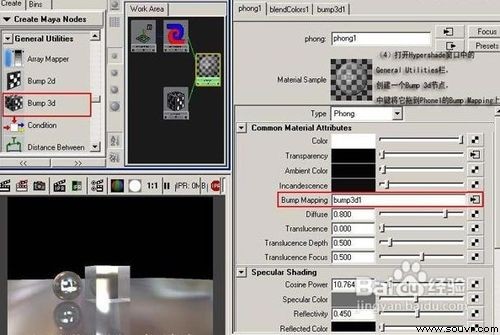
 4、打开Hypershade窗口中的General Utilities栏,创建一个Bump 3d节点,中键将它拖到Phone1的Bump Mapping上
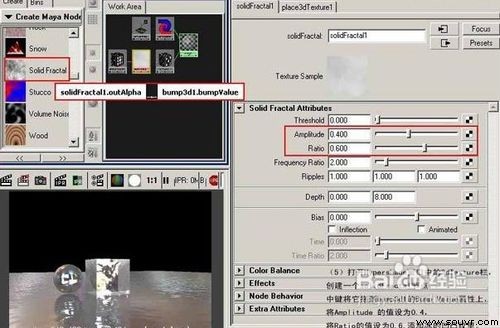
 5、打开Hypershade窗口中的3dTexture栏,创建一个solidFractal节点,中键将它拖到bump3d1的Bump Value属性上。将Amplitude的值设为0.4,将Ratio的值设为0.5,添加冰的凹凸纹理
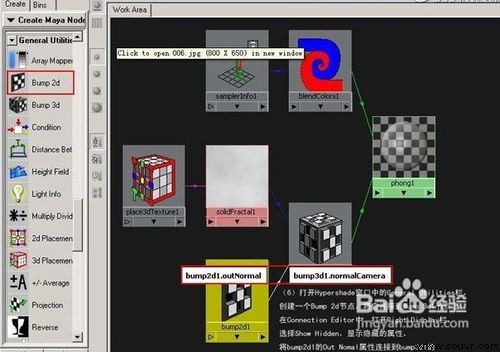
 6、打开Hypershade窗口中的General Utilities栏,创建一个Bump 2d节点,将它连接到Bump 3d1节点上,在Connection Editor中,打开Right Display栏,选择Show Hidden,显示隐藏的属性,将Bump2d1的Out NomaI属性连接到bump3d1的normalCamera
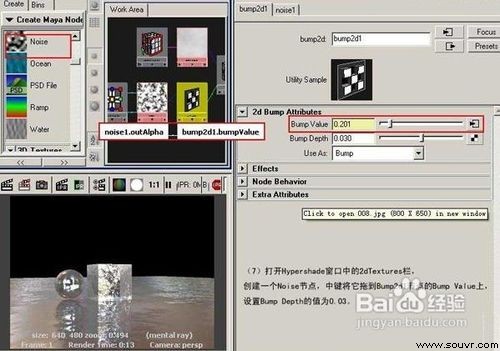
 7、打开Hypershade窗口中的2dTextures栏,创建一个Noise节点,中键将它拖到Bump2d1节点的Bump Value上,设置Bump Depth的值为0.03
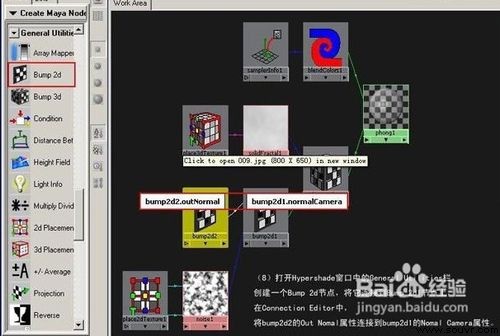
 8、打开Hypershade窗口中的General Utilities栏,创建一个Bump 2d节点,将它连接到Bump 2d1节点上。在Connection Editor中,将Bump2d2的Out Nomal属性连接到bump2d1的Nomal Camera属性
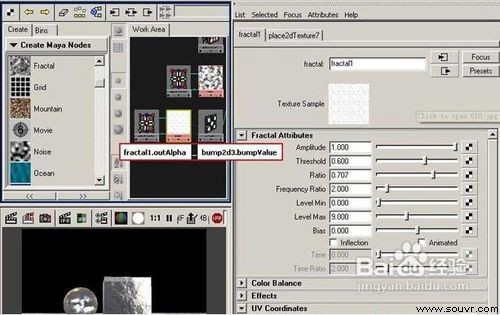
 9、打开Hypershade窗口中的2dTextures栏,创建一个fractal节点,中键将它拖到Bump2d3节点的Bump Value上,设置Threshold的值为0.6。最终效果如图中所示
 下一篇:maya制作玻璃材质
制作软件:MAYA步骤:
1、首先,创建一个Phone材质,赋予场景中的物体。将Color调成白色,Cosine Power的值设为10,Reflectivity的值设为0.5
2、打开Hypershade窗口中的Color Utilities栏,创建一个Blend Colors节点,将color1设为白色,color2设为黑色,将它连接到phong1材质的Transparency属性上,物体呈半透明状态
3、打开Hypershade窗口中的General Utilities栏,创建一个samplerInfo节点,中键将它拖到Blend Colors节点上,在Connection Editor中,将samplerInfo节点的facingRatio属性连接到Blend Colors的Blender属性,这样物体和摄像机比较接近,垂直的面就接近透明,和摄像机方向接近平行的面,接近不透明
4、打开Hypershade窗口中的General Utilities栏,创建一个Bump 3d节点,中键将它拖到Phone1的Bump Mapping上
5、打开Hypershade窗口中的3dTexture栏,创建一个solidFractal节点,中键将它拖到bump3d1的Bump Value属性上。将Amplitude的值设为0.4,将Ratio的值设为0.5,添加冰的凹凸纹理
6、打开Hypershade窗口中的General Utilities栏,创建一个Bump 2d节点,将它连接到Bump 3d1节点上,在Connection Editor中,打开Right Display栏,选择Show Hidden,显示隐藏的属性,将Bump2d1的Out NomaI属性连接到bump3d1的normalCamera
7、打开Hypershade窗口中的2dTextures栏,创建一个Noise节点,中键将它拖到Bump2d1节点的Bump Value上,设置Bump Depth的值为0.03
8、打开Hypershade窗口中的General Utilities栏,创建一个Bump 2d节点,将它连接到Bump 2d1节点上。在Connection Editor中,将Bump2d2的Out Nomal属性连接到bump2d1的Nomal Camera属性
9、打开Hypershade窗口中的2dTextures栏,创建一个fractal节点,中键将它拖到Bump2d3节点的Bump Value上,设置Threshold的值为0.6。最终效果如图中所示
下一篇:maya制作玻璃材质
上一篇:maya制作玻璃材质[ 02-13 ]
下一篇:Vray渲染静帧教程:逼真的影楼灯光效果[ 02-13 ]

